I want clean marks on bottles. I also want no cracks, no burns, and no wasted time. Many guides confuse first‑time users. I will cut the noise. I will show you what works today, step by step.
You can engrave bottles with the right laser and setup. Use fiber for metal bottles with a rotary. Use UV or CO2 for glass and plastics. Control power, speed, and focus. Add marking spray for glass. Manage fumes. Then your marks will be clear and permanent.
I build and OEM laser machines at Kirin Laser. I work with glass, metal, and plastic bottles every week. I will answer your exact questions. I will share a short client story. I will give clear steps you can use today.
Can I engrave glass with a fiber laser?
Glass is tricky. Many users try fiber first. Then they get cracks, chips, and faint marks. The problem is physics. The glass does not absorb 1064 nm well. So the energy does not couple. The surface fails in random ways.
You should not use a fiber laser on glass bottles. Use a UV laser for direct glass marking. Or use a CO2 laser for frosted marks. If you must use fiber, apply a dedicated UV-curable or ceramic marking spray, then mark the spray, not the glass.
Why fiber struggles on glass
I keep the science simple. Fiber lasers run at 1064 nm. Soda-lime glass does not absorb that wavelength well. The beam passes through or heats tiny spots. This causes micro-fractures. The result looks rough and cloudy. I can push power higher, but the risk grows. The glass can chip or crack. The mark is not stable.
What works better
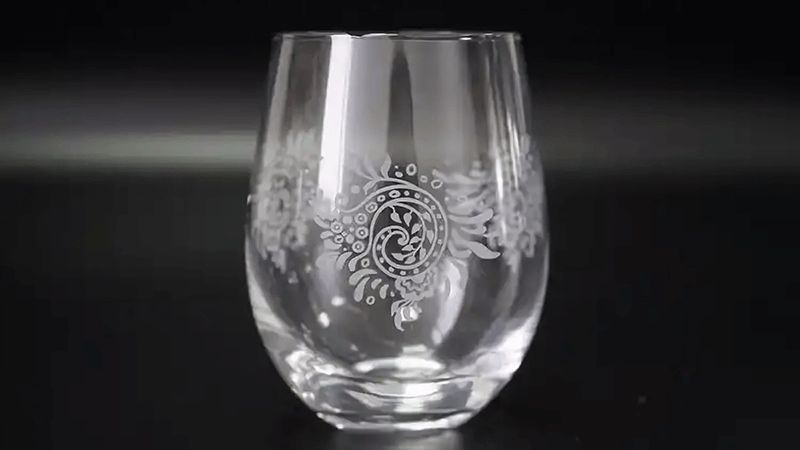
I switch to a UV laser1 at 355 nm when I need crisp, shallow marks on glass. UV light couples into the surface well. The process is photochemical, not just thermal. So the edge looks clean. The stress is lower. The contrast is high with a light frosting effect. For rustic or matte marks, I use a CO2 laser2. CO2 gives a nice frosted look on glass. It is common for craft brands.
When a client insists on fiber
I sometimes get a tight budget or a hard deadline. The client only has fiber on the floor. In this case, I apply a specialized UV or ceramic marking spray3. The spray absorbs the fiber energy4. The laser bonds the pigment to the surface. I focus to the spray layer, not the glass. I use fast speed, low to mid power, and high frequency. This reduces heat input. After marking, I rinse off the unbonded spray. The mark stays. This process lowers crack risk. It also boosts contrast. It is slower than UV or CO2, but it can work when you have no other option.
Settings I start with
I run 15–25 kHz, 15–30% power on a 20–50 W fiber source, 800–1200 mm/s speed, and 0.02–0.04 mm hatch. I use a 254 mm lens for larger areas on bottles. I keep air assist gentle. I avoid long dwell. I test on waste glass first. Small changes matter on glass.
Quick reference
| Option | Best use | Look | Risk | Notes |
|---|---|---|---|---|
| UV laser | Fine logos, text | Crisp, light | Low | Best choice for glass |
| CO2 laser | Frosted art | Matte | Low-Med | Good for craft brands |
| Fiber + spray | Budget workaround | Dark, bonded | Med | Needs correct spray and rinse |
I learned this the hard way. A beverage client had smudging ink labels on premium glass. I moved them to a UV laser with a dedicated marking spray. The result was sharp and permanent. Their brand stood out on shelves. Their codes passed audits. Their line ran smoother.
What can I engrave with a fiber laser?
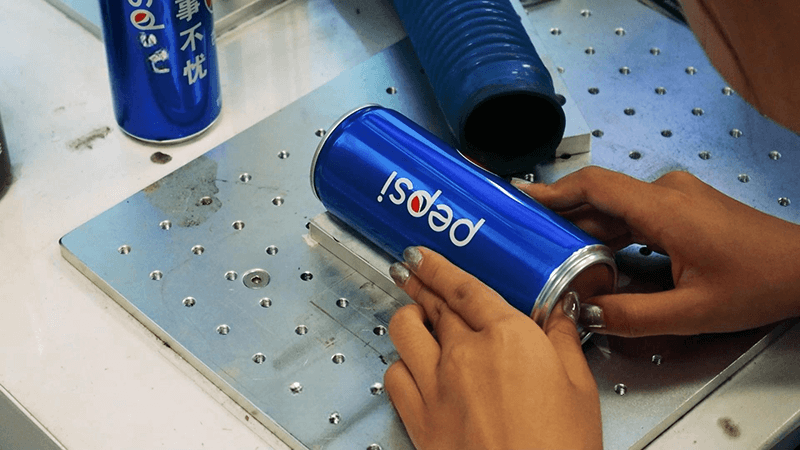
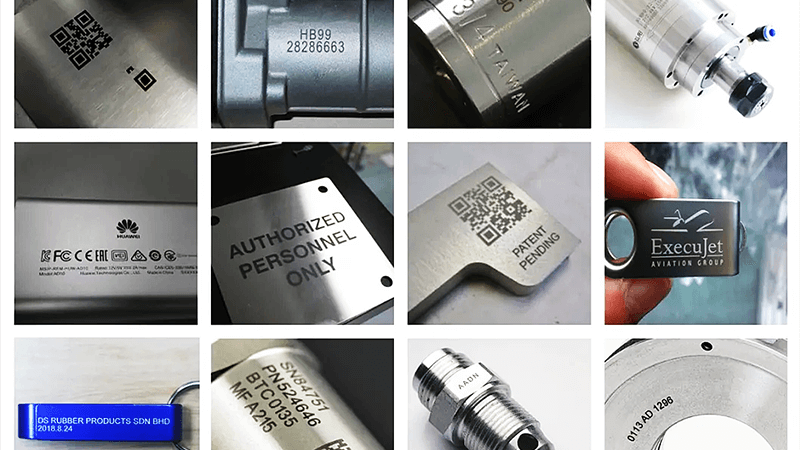
Fiber lasers shine on metals. They also work on some plastics. They do deep engrave, anneal, black mark, and color mark on steel. They do fast codes on aluminum. They do serials on titanium. This range is why I choose fiber for metal bottles.
You can engrave stainless steel, aluminum, titanium, brass, and coated metals with a fiber laser. You can mark some engineering plastics and PCBs. For metal bottles, use a rotary to keep focus on the curve. For glass or most plastics, use UV or CO2 instead.
Core strengths on bottles
Metal drinkware is a perfect match for fiber5. I engrave stainless steel sport bottles, aluminum canteens, and titanium flasks every week. The marks are durable. The codes are readable. The cycle time is low. I use annealing6 for food-grade stainless when I want no depth and no burr. The surface stays smooth. The color turns dark due to oxide layers. It looks premium. I use deep engraving when I want a tactile or paint-fill result. I push power and reduce speed. I add multiple passes.
Rotary for curved surfaces
A bottle is a cylinder. The beam spot must stay normal to the surface. A rotary axis7 turns the bottle while the laser scans. Focus stays constant. The mark looks even. Without a rotary, the mark can stretch and blur at the edges. I align the logo centerline to the bottle seam or a clamp reference. I check runout. I set Z height at the midline.
Plastics and coatings
Fiber can mark some dark engineering plastics that absorb 1064 nm. It can also mark painted or anodized layers by removing or foaming the coating. But it can melt soft plastics. It can cause odor and smoke. For most consumer plastics, I pick UV8. UV gives clean edges and low heat.
Typical fiber applications on bottles
| Material | Method | Look | Notes |
|---|---|---|---|
| Stainless steel | Anneal or deep | Black or etched | Food-safe when annealed |
| Aluminum (anodized) | Ablate color | White on dark | Very fast and high contrast |
| Aluminum (raw) | Engrave | Gray | Consider passivation after |
| Titanium | Anneal or color | Dark or rainbow | Needs tight control |
| Powder coat | Ablate | Substrate reveal | Great for branded drinkware |
Practical setup for throughput
I set up a jig for 3–6 bottles per batch with a swap system. While the rotary runs one bottle, I prep the next. I set marks in EZCAD or LightBurn with variables for serials and dates. I test with a checkerboard of power and speed. I log the best cell. I save it as a material file. This repeatability keeps my clients happy and my operators calm.
What materials will a fiber laser engrave?
I avoid guesswork. I carry a small kit of coupons. I test new lots before I run production. Fiber lasers love metals. They also mark some plastics and coated parts. They are poor for glass and clear plastics without help.
Fiber lasers engrave metals like stainless steel, aluminum, titanium, brass, and tool steel. They also mark some plastics, ceramics, and coated parts. They do not work well on glass or clear acrylic. For those, use UV or CO2 or apply marking sprays.
Metals: the strong zone
I rely on fiber for stainless steel9, aluminum, titanium, brass, copper, and hardened steel. I can switch between surface anneal, shallow etch, deep engrave, and black marking. I adjust pulse frequency, duty, and speed. I keep an eye on heat. For aluminum, I increase speed and reduce power to avoid burrs. For tool steel, I use higher power and lower speed to get depth. I add passes with a cross-hatch.
Plastics: handle with care
Fiber can mark some additives in plastics. Dark ABS, PA, PC, and PBT can show a gray or black mark. But results vary by batch. The resin blend matters. The pigment load matters. I always test. If I see melting or a sticky edge, I stop and move to UV. UV is safer for logos10 near seams and caps on bottles. It leaves less heat effect.
Coatings and films
Anodized aluminum drinks ware marks great with fiber. I remove the dyed layer and reveal white. Powder coat also marks well. I ablate the top layer and show the base metal. Paints vary. Some burn. Some foam. I test with a low power ramp. I also use masking to keep edges crisp.
Not ideal with fiber
Clear glass, clear acrylic11, and PET do not absorb 1064 nm well. The mark is weak or the part is damaged. Ceramics can work if they have pigments or glazes that absorb. But it is inconsistent. Stone is hit or miss. I only promise results on stone after a paid sample run.
Quick map
| Category | Good with fiber | Maybe with fiber | Better with UV/CO2 |
|---|---|---|---|
| Metals | SS, Al, Ti, brass, tool steel | Copper with care | — |
| Plastics | Dark PA, ABS, PC with fillers | Some PBT, PEI | PET, PP, PE, clear PC |
| Coatings | Anodized Al, powder coat | Painted steel | Organic paints, varnish |
| Glass/Clear | — | With marking spray | UV for fine, CO2 for frost |
My rule for bottles
I pick fiber for metal bottles. I pick UV for glass bottles. I pick UV or CO2 for plastic bottles. I use a rotary for curved shapes. I keep focus tight. I keep heat low. I plan for fume control.
Should I paint before or after laser engraving?
I think about the final look first. I think about line speed next. Paint timing changes both. Some brands want raw metal contrast. Some want color fill. Some want to remove paint and reveal metal. The sequence matters.
Engrave first, then paint-fill, if you want recessed, colored marks. Paint first, then engrave, if you want clean metal exposed through the coating. For glass, spray or coat before marking to get contrast, then rinse after. Always test adhesion and cure.
Two common workflows
I use two workflows for bottles. The first is engrave then paint-fill. I cut a shallow cavity with fiber. I clean the cavity with IPA. I mask the area. I push paint into the recessed area. I remove excess. I cure it. The result is vivid and durable. It resists abrasion because the paint sits below the surface. The second is coat then ablate12. I coat the bottle with powder or paint. I mark with fiber to remove the top layer. I reveal the base metal or a primer. The edges look sharp. The cycle is fast.
How I choose
If the bottle is stainless and the brand wants bold colors, I choose engrave then fill. If the bottle already has a powder coat, I choose ablation. If the brand wants a minimal look, I anneal stainless with no paint. For aluminum with anodize, I ablate only. It is crisp and quick.
Glass and UV process
Glass is different. I often apply a marking spray or a ceramic ink before UV marking. The laser bonds the material. I rinse off the rest. The mark stays dark. If the client wants a color, I can add a cold enamel fill into a lightly etched cavity made by UV. I keep heat low to avoid stress.
Workflow comparison
| Goal | Sequence | Laser | Pros | Cons |
|---|---|---|---|---|
| Color in grooves | Engrave -> paint-fill | Fiber | Durable, premium | Added steps, cure time |
| Metal reveal | Paint -> ablate | Fiber | Fast, crisp edges | Needs coat control |
| Frosted glass | Direct mark | CO2 | Classic look | Lower contrast |
| Dark on glass | Spray -> mark -> rinse | UV | High contrast | Spray cost, process time |
Practical tips
I scuff lightly before paint-fill13 for better grip. I use two thin coats, not one thick coat. I set drying by spec. I avoid silicone near the mark. I use fine nozzles. I log lot numbers for paint and bottles. I keep a small retention sample for every run. These small habits prevent rework.

Do you need a fume extractor for laser engraving?
Yes, you do. Fumes are real. They smell bad. They harm health. They kill optics. They slow production when operators need breaks. A proper extractor keeps air clean. It also protects your lenses and your brand.
A fume extractor is essential. It captures particulates and VOCs from metals, coatings, and sprays. It protects operators, reduces residue, and extends lens life. Choose a unit with HEPA and activated carbon. Size it to the enclosure and the process.
What comes off a bottle
Metal engraving produces fine metal dust. Powder coat ablation produces pigment and resin fumes. Paint-fill can off-gas solvents during cure. Glass marking with sprays produces ceramic or pigment particles. These are not safe to breathe. They also settle on optics and rails. I have seen a lens fail in months when there is no extraction. With proper capture, the same lens runs clean for years.
What extractor to use
I use an enclosure with negative pressure and a fume extractor14 that has a pre-filter, a HEPA filter15, and a carbon stage. The pre-filter catches large dust. The HEPA catches fine particles. The carbon stage absorbs VOCs. I size airflow to the enclosure volume and the leak points. I like a face velocity near 0.5 m/s at the openings. I keep duct runs short. I avoid sharp bends.
Maintenance
I set a filter change schedule. I log pressure drop. When the pressure rises, I swap filters. I keep spare filters on hand. I also clean the enclosure glass and the lens window weekly. I add a sacrificial window under the lens. It is cheap and easy to replace. This protects the F-theta lens.
Airflow and quality
| Component | Role | Notes |
|---|---|---|
| Pre-filter | Captures big dust | Replace often to save HEPA |
| HEPA | Captures fine particles | Check pressure drop |
| Carbon | Adsorbs VOCs | Replace by odor or hours |
| Enclosure | Keeps capture efficient | Reduces room air mixing |
Safety and compliance
My customers in the U.S. ask about OSHA and local codes. A good extractor helps meet safety rules. It creates a better work setting. It reduces complaints and turnover. It also helps pass audits for large buyers. I treat air like a core process, not a cost. It pays back in uptime.
Conclusion
Bottle engraving16 is not guesswork for me. Fiber lasers are perfect for metal bottles, with a rotary and tuned settings. UV or CO2 is better for glass and most plastics. Sprays help when hardware is fixed. Paint timing follows the look you want. A fume extractor is not optional. It protects people and machines. I test, log, and standardize. Then I scale. This is how I support fast launches and steady growth for my clients.
-
Explore the advantages of UV lasers for glass marking, including crispness and low stress on materials. ↩
-
Learn how CO2 lasers produce beautiful frosted effects, ideal for craft brands and artistic designs. ↩
-
Discover how ceramic marking spray enhances laser marking processes and improves results on glass. ↩
-
Understand the concept of fiber energy in laser marking and its applications in various industries. ↩
-
Explore the advantages of fiber lasers for engraving, including speed and precision, which can enhance your projects. ↩
-
Understand the annealing process and its importance in achieving food-safe and high-quality engravings on stainless steel. ↩
-
Learn how a rotary axis can ensure even and high-quality engravings on curved surfaces, crucial for professional results. ↩
-
Discover the benefits of UV lasers for marking plastics, including clean edges and minimal heat, perfect for delicate materials. ↩
-
Explore this link to understand how fiber technology enhances marking on stainless steel, ensuring precision and quality. ↩
-
Discover why UV marking is preferred for logos on plastics, ensuring durability and aesthetic appeal. ↩
-
Find out the limitations of using fiber on clear acrylic and alternative solutions for effective marking. ↩
-
Discover the ablate process to understand its efficiency in revealing base metals and achieving sharp edges. ↩
-
Explore this link to learn effective techniques for achieving vibrant and durable paint-fill results. ↩
-
Explore this link to find top-rated fume extractors that ensure safety and efficiency in your workspace. ↩
-
Learn how HEPA filters can significantly enhance air quality, protecting your health and equipment. ↩
-
Find the best laser marking machine and laser marking solutions from Kirin Laser, clicking this link to get all your needs for your business. ↩